You found the perfect launch monitor. You’ve watched every YouTube build video looking for golf simulator design ideas. But you’re standing in your basement, garage, or spare bedroom staring at a tape measure and the real question hits you: Is this space actually going to work?
That’s the moment most people underestimate. The technology side of a golf simulator is well-documented. The room design side? That’s where builds go sideways and where they go from “cool setup” to something you’d genuinely show off to every golfer you know.
This guide covers real golf simulator room design ideas across space types, aesthetics, and budgets. Whether you’re converting a garage, finishing a basement, or building a dedicated sim room from scratch, here’s how to think through the design before you spend a dollar on equipment.
Why Room Design Usually Comes Last (and Why That’s Backwards)
Most golfers plan their simulator in this order: launch monitor → software → screen → projector → “figure out the room later.”
That order is wrong.
Your room dimensions determine your screen size. Your ceiling height determines which clubs you can swing. Your room depth determines where your launch monitor can live. Get the room wrong, and every other decision cascades into a compromise.
A room that’s too shallow forces you to move your hitting position so close to the screen that a thin shot can damage it. A ceiling that’s 8 feet tall instead of 10 means you’re modifying your driver swing which completely defeats the purpose of practicing at home. And a room that’s only 10 feet wide makes it nearly impossible for left-handed players to use the setup comfortably.
Design the room first. Everything else follows.

Click on the link to go directly to that design, or simply scroll down the page to see them all. If you don’t see the exact package you want, you can try out a custom design tool like Carl’s Golf Simulator Design Tool (we created an explainer video link here).
6 Golf Simulator Room Design Ideas (With Real Examples)
Once your dimensions are locked, the fun starts. Here are the most popular room design approaches we’ve seen from the Yardstick Golf community and the Sim Weekly newsletter.
1. The Clean Studio Build

Best for: Serious practice-focused golfers who want a distraction-free environment.
This is the tour-style setup. Dark walls (charcoal, deep navy, or matte black) with the enclosure as the focal point. No clutter. Recessed lighting or LED strips along the ceiling perimeter to eliminate shadows on the screen. A single, clean hitting mat centered on the enclosure.
The design principle here is removing anything that distracts your eye from the impact screen. Golf simulation accuracy improves when there’s strong visual contrast between the bright projected image and the surrounding room. Light-colored walls actually work against you here — they create ambient glow that washes out your projector image, especially in smaller rooms.
One builder featured in our Sim Weekly newsletter took this approach in his 12×18 Colorado garage. He used a matte black ceiling, inset his hitting mat into a platform with black turf around it for a seamless “tour bay” look, and added a second monitor on a side wall for shot data. The result looks more like a Trackman facility than a garage. The key decision: he chose wall color before buying his projector, which let him spec the right brightness for the room.
Key design choices:
- Dark walls and ceiling (matte black or deep charcoal)
- Single-color hitting mat platform, flush with surrounding turf
- No overhead light directly above the hitting zone
- Cable management recessed into walls or baseboards
- Shot data on a secondary display, not overlaid on the main screen
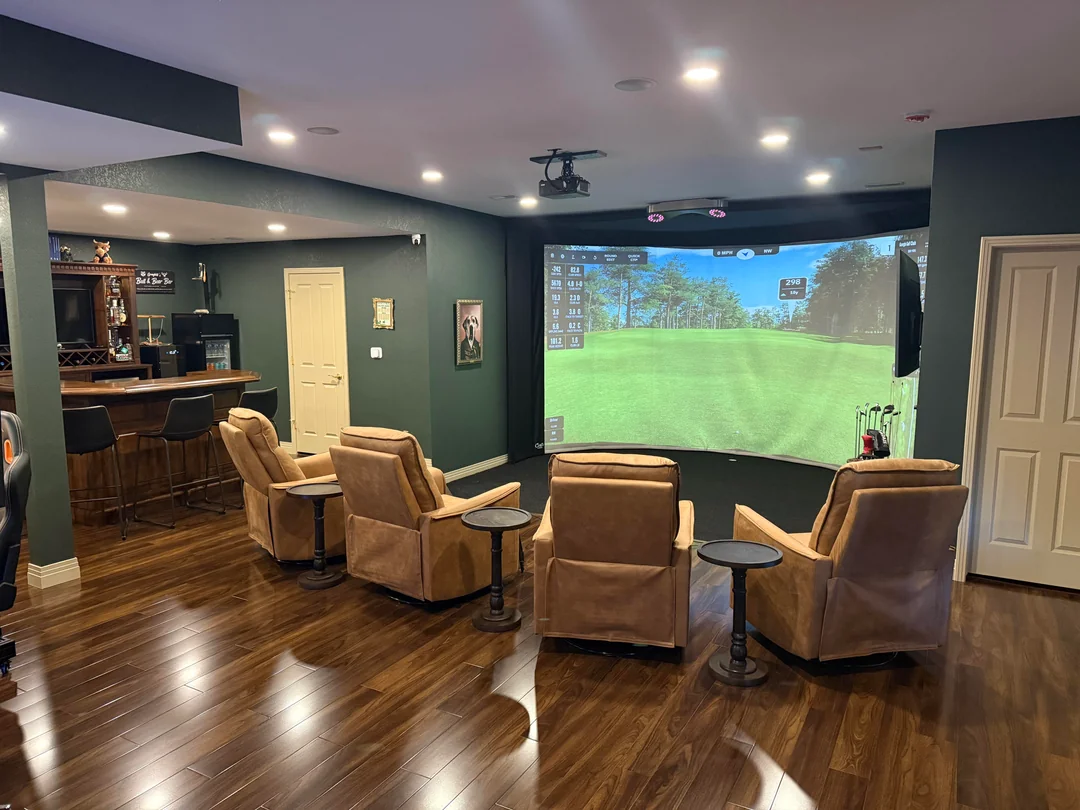
2. The Lounge Build

Best for: Golfers who entertain and want the sim room to function as a hangout space.
The lounge build is the most social-forward design. Behind the hitting position, you’re adding real seating — not folding chairs, but a sectional sofa or loveseat, a bar cart or mini-fridge, and enough ambient lighting to make the space feel like a room, not a utility closet.
The key design challenge with a lounge setup is depth. You need your hitting zone plus a lounge area behind it, which means you want at least 18–20 feet of total room depth. The seating area needs to be far enough back that spectators are clearly out of swing range — a minimum of 5 feet behind the tee position is the rule.
Sound is your second challenge. Golf simulators aren’t quiet — you’ve got ball impact, fan noise from the projector, and music if you’re running it through a speaker system. Soft furnishings (sectionals, rugs, curtains) do double duty here: they’re comfortable AND they absorb sound waves. One interior designer featured in an installation writeup we referenced for this piece noted that her client chose boucle fabric for the sectional specifically because it’s both luxurious and acoustically functional.
Lighting design matters more in lounge builds. You want dimmable ambient lighting (warm-toned) behind the seating area, and controllable task lighting near the hitting zone. A smart plug system that dims the room when the projector fires up adds a nice theatrical touch.
Key design choices:
- Sectional or loveseat at least 5 feet behind tee position
- Bar cart, mini-fridge, or built-in shelving on side walls
- Dimmable warm lighting in seating zone
- Rug or carpet tile under seating area for sound absorption
- TV or secondary display on side wall for watching real golf between rounds
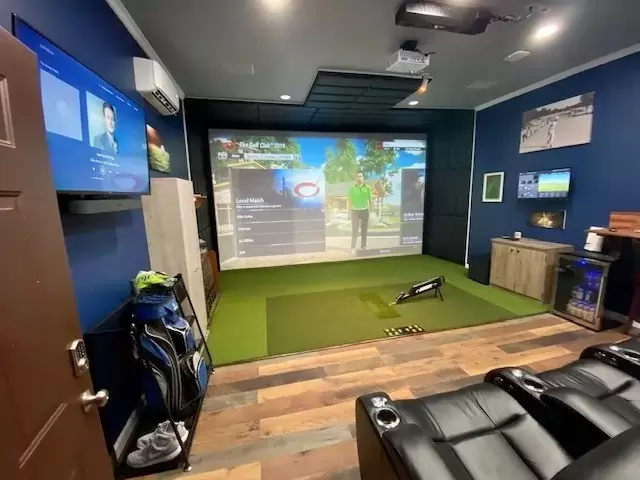
3. The Garage Conversion


Best for: Homeowners who want maximum space without a dedicated room build.
Most two-car garages sit around 20–22 feet deep and 18–20 feet wide — which is nearly ideal for a simulator. The challenges are: concrete floors, HVAC, and the fact that you still want to park a car.
If you’re committing fully to a sim garage, the single best investment you can make before equipment is floor finishing. Epoxy-coated concrete with a rubber mat in the hitting zone gives you a clean, durable surface that’s easy to clean and looks intentional. You don’t need luxury flooring here — you need something that holds up to repeated foot traffic, the occasional dropped club, and seasonal temperature swings.
HVAC is a common afterthought that becomes a constant problem. Garages in climates with hot summers or cold winters are miserable to use without conditioning. A mini-split system is the most efficient solution — typically $1,500–$3,500 installed — and it will directly impact how often you actually use the space. A simulator you avoid because it’s 50°F in January is a simulator that isn’t paying for itself.
The retractable screen option is worth considering for garage builds where you still want to use the space for storage or parking. Systems from HomeCourse and G-Trak allow the screen to roll up when not in use. Our retractable golf simulator screen guide covers these options in detail — they’re a legitimate solution if dual-use is a real need, though you’ll pay a premium for the convenience.
Key design choices:
- Epoxy or polyurea floor coating (do this before simulator arrives)
- Mini-split HVAC — non-negotiable in most climates
- Retractable screen if dual use is needed
- Side wall pegboard or shelving for club storage
- Weatherstripping on garage door to manage temperature and humidity
4. The Basement Build
Best for: Homeowners with unfinished basements who want a permanent dedicated space.
Basements are the most controlled environment for a simulator — consistent temperature, no natural light interference on the screen, and a dedicated space that doesn’t compete with other household uses.
The ceiling height concern is real in many basements. Unfinished basements with exposed joists often sit at 8.5–9.5 feet from the concrete floor to the bottom of the joist — not the top. A finished ceiling drops another 4–6 inches. If your basement is 9 feet unfinished, you may be at 8.5 feet finished, which limits your swing options.
One common solution: drop the floor in the hitting zone. Lowering the concrete pad by 4–6 inches in a 5×5 foot hitting area is a masonry project that costs $500–$1,500 in most markets but effectively gains you ceiling height where it matters most. This is a building permit issue in some jurisdictions, so check with your local code office.
Lighting in a windowless basement is entirely your choice. We favor a layered approach: recessed LED cans on dimmers for general illumination, plus bias lighting behind the enclosure perimeter (LED strips in the 2700K warm range) to reduce eye strain during longer sessions.
For layout ideas specific to different basement configurations, our basement golf simulator guide walks through common floor plans and how to navigate low ceilings, support columns, and mechanical room placement.
Key design choices:
- Measure to the finished ceiling height, not the joist
- Consider floor excavation if ceiling is under 9 feet
- Eliminate all natural light sources (paint basement windows or cover them)
- Dehumidifier in the mechanical room to protect electronics
- Rubber flooring in the hitting zone for sound and impact absorption
5. The Shed or Backyard Build


Best for: Golfers with no usable indoor space who want a dedicated sim structure.
Golf simulator sheds are growing in popularity precisely because they solve the space problem without sacrificing a room inside the house. A new 12×20 or 14×24 shed can be purpose-built to your exact simulator specs — and you choose the ceiling height from the start.
Pre-engineered shed kits on the market can be ordered with 10-foot sidewalls and insulation options built in. The total cost for a finished, climate-controlled sim shed (including site prep, electrical, HVAC, insulation, and interior finishing) typically runs $15,000–$35,000 depending on size and finishes — separate from the simulator cost. That’s not cheap, but it’s a permanent asset that adds to your property value.
Electrical planning is the most important pre-construction decision. A golf simulator projector, launch monitor, computer, and HVAC unit on a dedicated circuit means you’ll want a 200-amp sub-panel run from your main panel. Plan this during permitting, not after the shed is built.
The noise isolation advantage of a backyard shed is real. If you have family members or neighbors sensitive to impact noise, separating the sim from the living space is worth the extra cost. Our community members who’ve gone this route consistently report that the separation increases how freely they use the simulator — knowing you can hit balls at 9pm without waking anyone up changes your relationship with the space.
Key design choices:
- Build ceiling height at 10–11 feet from floor to ridge (not sidewall)
- Insulate to at least R-13 in walls and R-30 in the ceiling
- Run a 240V circuit for mini-split HVAC as part of initial electrical plan
- Interior: OSB or drywall on walls, painted dark for simulator use
- Consider a small bathroom rough-in if the shed is far from the house
6. The Classic Clubhouse Vibe
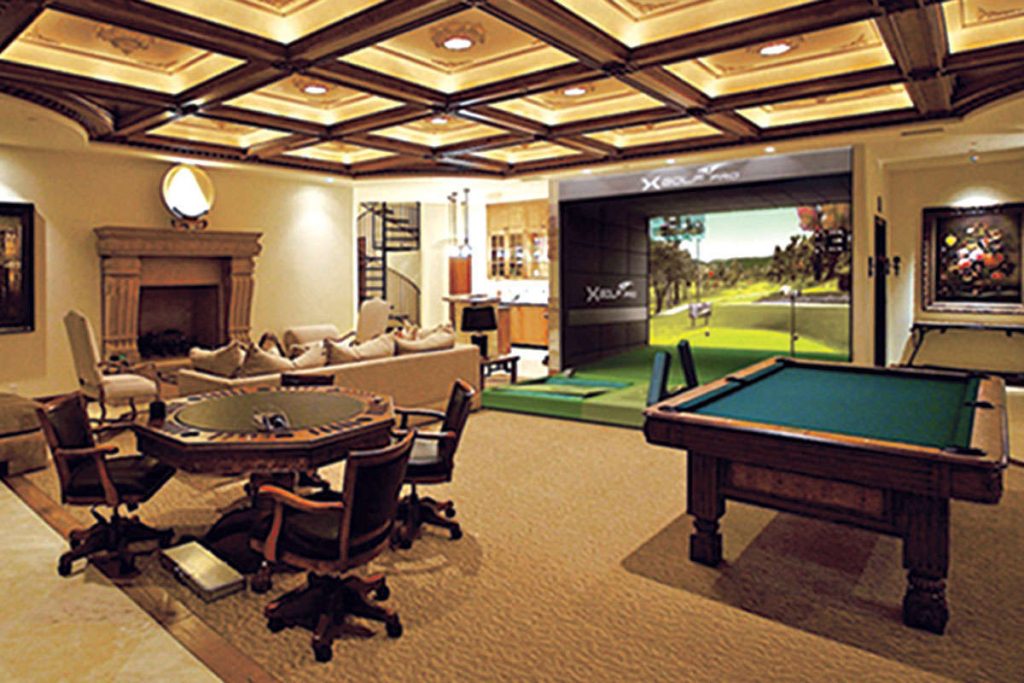
Best for: Golfers who want the room to feel like a private club, not a man cave.
This is the design direction that photographs best and ages the most gracefully. Dark wood paneling (or a convincing alternative like wood-look wall panels), warm brass or bronze hardware, framed vintage course artwork, and club-style furnishings create a room that feels curated rather than assembled.
The contrast between this aesthetic and a modern tour studio setup is the warmth. Leather or leather-look seating in cognac or dark green. A small wet bar or bar cabinet. Dimmer switches on every light. A putting green inset in front of the hitting area for between-hole entertainment.
The risk with this design direction is that the visual warmth of the room can fight your projector. Warm ambient lighting is the enemy of image contrast. The solution is smart lighting control: during simulation, the room dims to near-zero ambient light, with the only illumination coming from the projected image. When you’re between rounds or entertaining, the warm lighting takes over. Smart bulbs and a simple automation routine handle the transition with one tap.
For adding a putting green to this kind of setup — whether it’s a simple carpet roll or a multi-break artificial putting green — our indoor putting green guide covers the options across price points.
Key design choices:
- Wood-look paneling on accent wall behind seating
- Vintage course photography or framed scorecards as wall art
- Warm leather seating in green, cognac, or navy
- Smart lighting with “sim mode” scene (near blackout) vs. “lounge mode”
- Inset putting green in front of hitting zone
Room Design Details That Separate Good Builds from Great Ones
Lighting Over the Hitting Zone
Never install a recessed can light directly above the hitting position. The light shines directly down the shaft at address and creates a hot spot on the impact screen. Position overhead lighting 3–4 feet to the sides of the hitting zone, or use wall-mounted fixtures angled away from the screen.
Sound Management
Golf simulators produce three types of noise: ball impact (sharp, loud), projector fan hum (constant, low), and software audio (music and course sounds). Soft wall treatments — acoustic foam panels, wall-to-wall carpet, or even heavy curtains — address all three. You don’t need to fully soundproof the room, but bare concrete walls and no soft furnishings will make the space unpleasant to be in for extended sessions.
Cable Management
This is the aesthetic detail most DIY builders underestimate. A simulator setup has cables running between the launch monitor, the PC, the projector, and any secondary displays. Floor-mount cable raceways are the minimum solution. For a cleaner look, run conduit inside the walls during construction — a decision you can’t easily reverse after the drywall goes up.
Flooring in the Hitting Zone
The area directly in front of your enclosure takes more abuse than the rest of the room. Your hitting mat lives here, but the surrounding area should be a surface that holds up to cleats or spikes (if you want to simulate course feel), repeated foot traffic, and the occasional dropped metal club. Rubber flooring tiles, commercial carpet tile, or synthetic turf are all durable options. Avoid polished concrete without a non-slip coating — it’s a hazard in golf shoes.
Choosing Your Projector Position
The projector position determines your room layout as much as anything else. Short-throw projectors (0.5:1 or lower throw ratio) allow ceiling or floor mounting close to the screen, which opens up the room behind the hitting zone. Standard throw projectors need more distance between the lens and screen, which can force you to mount the projector well behind the hitting position — sometimes requiring a ceiling mount over the hitting area, which creates shadow issues.
Our golf simulator projector guide covers throw ratios and mounting positions for the most popular projectors in the sim community. This decision has direct room design implications, so read it before you finalize your layout.
Matching the Room to Your Use Case
Before committing to a design direction, answer these three questions honestly:
Who will use this simulator, and how often? A solo practice setup optimized for one golfer can be tighter and more functional. A setup you plan to use with friends, family, or clients needs more lounge space and spectator comfort built in.
Is this primarily for game improvement or entertainment? Practice builds prioritize accuracy, shot data visibility, and minimal distraction. Entertainment builds prioritize comfort, aesthetics, and the social experience around the game.
What’s your budget for the room vs. the equipment? It’s common to spend $8,000–$15,000 on simulator equipment and underinvest in the room. A well-designed $3,000 room installation (flooring, lighting, cable management, paint) paired with a $10,000 simulator outperforms a $15,000 simulator dropped into an unfinished space with bare concrete and no thought given to ambient light or sound.
Golf Simulator Design Ideas: A Note on Planning Tools
Before committing to a layout, use Carl’s simulator design tool or sketch your room to scale with actual measurements. Painter’s tape on the floor to mark out the enclosure footprint, hitting zone, and seating area is a genuinely useful step — it shows you exactly where clearance issues exist before you’ve purchased anything.
If you want help planning the full system — not just the room, but the launch monitor, software, and enclosure that make sense for your space — our golf simulator planning tool on the Yardstick Golf DIY page walks you through component selection based on your space and budget. It’s built from community feedback from over 75,000 members of our Reddit golf simulator forum.
Final Thought: Design for the Session, Not the Photo
The best golf simulator rooms look good in photos. The great ones are places you actually want to spend two hours working on your game, hosting friends, or decompressing after a rough week. Those are different design goals, and they’re worth thinking through before you start buying materials.
The room comes first. Everything else follows from there.
Related reading:
- How to Plan Your Home Golf Simulator Build
- Golf Simulator Room Dimensions Guide
- Best Golf Simulator Projectors
- Golf Simulator Impact Screens and Enclosures
This website is a participant in the Amazon Services LLC Associates Program, an affiliate advertising program designed to provide a way for websites to earn advertising revenues by advertising and linking to Amazon.com. Some of the links on this page are affiliate links. This means that, at zero cost to you, I will earn an affiliate commission if you click through the link and finalize a purchase.