By Lem Clevenger | Updated February 2026 | Based on data from 500+ golf simulator owner surveys and the 75k+ member r/Golfsimulator community
Planning a golf simulator build is the most exciting — and most confusing — part of the journey. Room too short? Your driver hits the ceiling. Shed too narrow? You’re swinging with one eye closed. Business plan too thin? Investors walk.
Our golf simulator design ideas guide covers it all: room dimensions and floor plans, design ideas by room type, shed and garage builds, and even the basics of starting a commercial golf simulator business. Every recommendation is backed by real measurements, real builds, and real owner feedback.
Golf Simulator Ideas by Room Type
Good design isn’t just cosmetic — it directly affects how immersive and enjoyable your simulator feels. The rooms that look best and play best tend to share a few principles.


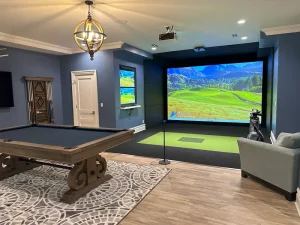
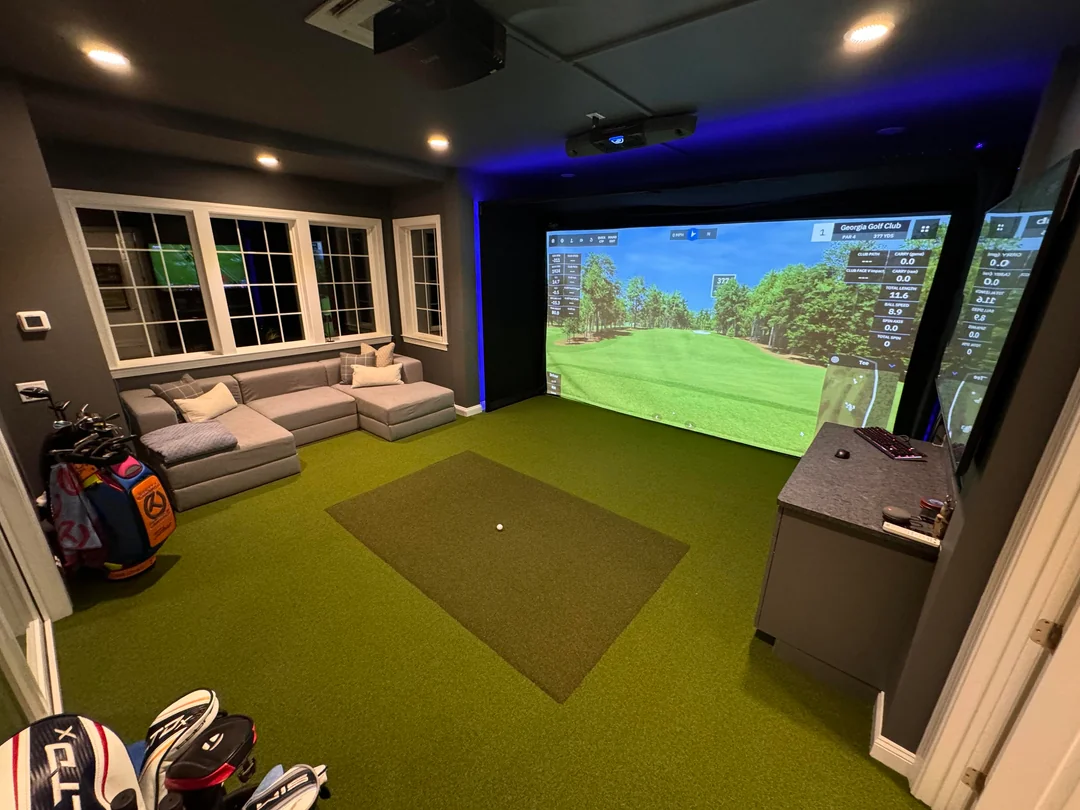
Golf Simulator Game Rooms
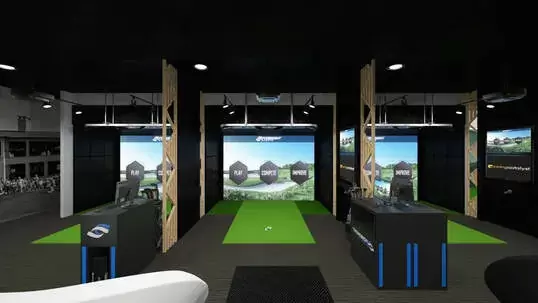
Commercial Simulators
Table of Contents
DIY GOLF SIMULATOR
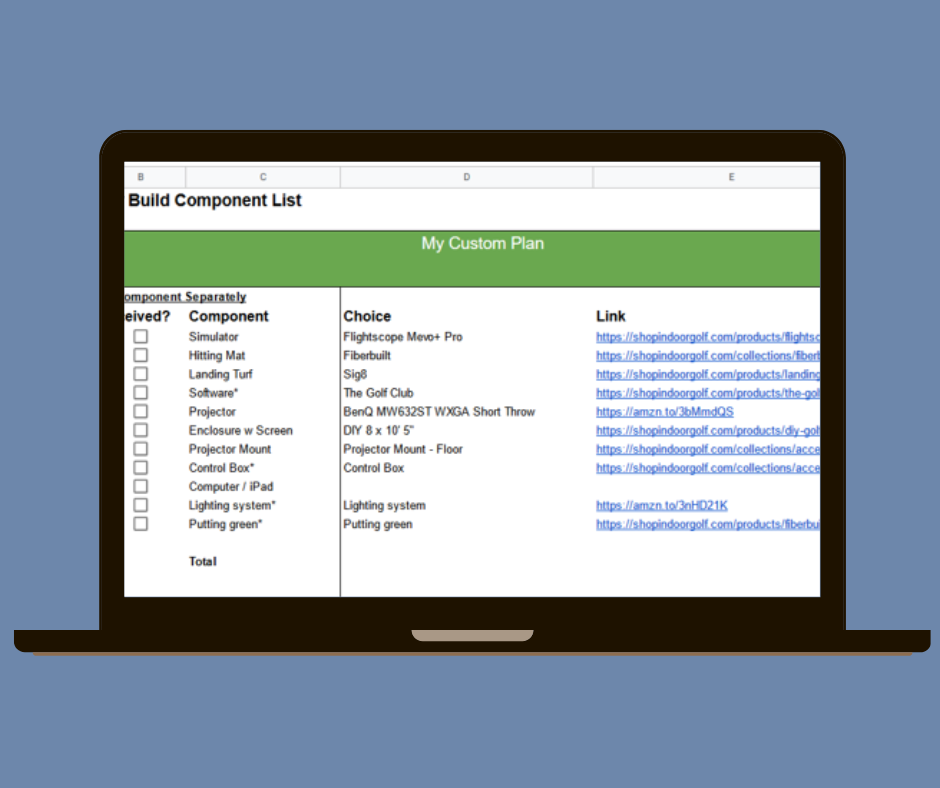
Free Golf Simulator Planning Tool
We built a free planning spreadsheet based on data from our survey of 500+ golf simulator owners. It helps you:
- Compare launch monitors by space requirements, accuracy, and price
- Estimate total build costs by budget tier
- Keep track of materials with a detailed checklist
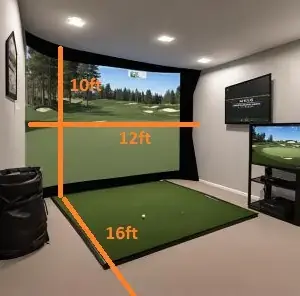
Golf Simulator Room Dimensions & Floor Plans
The single most important factor in your golf simulator build is space. Get this wrong and everything else — the launch monitor, the screen, the projector — is wasted money. Here are the numbers you need.
Minimum, Comfortable, and Ideal Room Sizes
| Dimension | Minimum | Comfortable | Ideal |
|---|---|---|---|
| Ceiling Height | 9 ft (2.7 m) | 10 ft (3.0 m) | 10–12 ft (3.0–3.7 m) |
| Room Width | 10 ft (3.0 m) | 12–14 ft (3.7–4.3 m) | 15–16 ft (4.6–4.9 m) |
| Room Depth | 15 ft (4.6 m) | 16–18 ft (4.9–5.5 m) | 18–20 ft (5.5–6.1 m) |
Ceiling height is the dimension you normally can’t change. At 9 feet, most golfers can swing irons and wedges comfortably. A 10-foot ceiling opens up full driver swings for the majority of players. If you’re over 6 feet tall, test your swing arc before committing to any space — grab your driver, stand on something the height of a hitting mat (about 2–3 inches), and take slow practice swings.
At 8 feet or below, you’ll need to restrict club selection and may only be comfortable hitting wedges and short irons. That’s still a useful practice station, but it’s not a full simulator experience.
Understanding Room Depth Requirements
Room depth gets complicated because your launch monitor type changes how much space you need. The depth breaks down into three zones:
- Screen buffer: 12–16 inches between the impact screen and the back wall
- Hitting-to-screen distance: 8–12 feet from the tee to the screen
- Backswing clearance: At least 6 feet behind the tee (you can get away with less, but others have to be very careful not to walk into a swing.
Camera-based launch monitors (Square, Foresight GCQuad, Bushnell Launch Pro) measure ball data at impact, so they’re forgiving in shorter rooms. Radar-based systems (Trackman, FlightScope Mevo+) track the ball in flight and typically need more depth — roughly 8 feet from the monitor to the ball and another 10+ feet from the ball to the screen.
Overhead monitors (Garmin Approach R50, Uneekor QED) fall somewhere in between. They mount on the ceiling above or just ahead of the hitting position and work well in rooms with 15–16 feet of depth.
Floor Plan Layout Tips
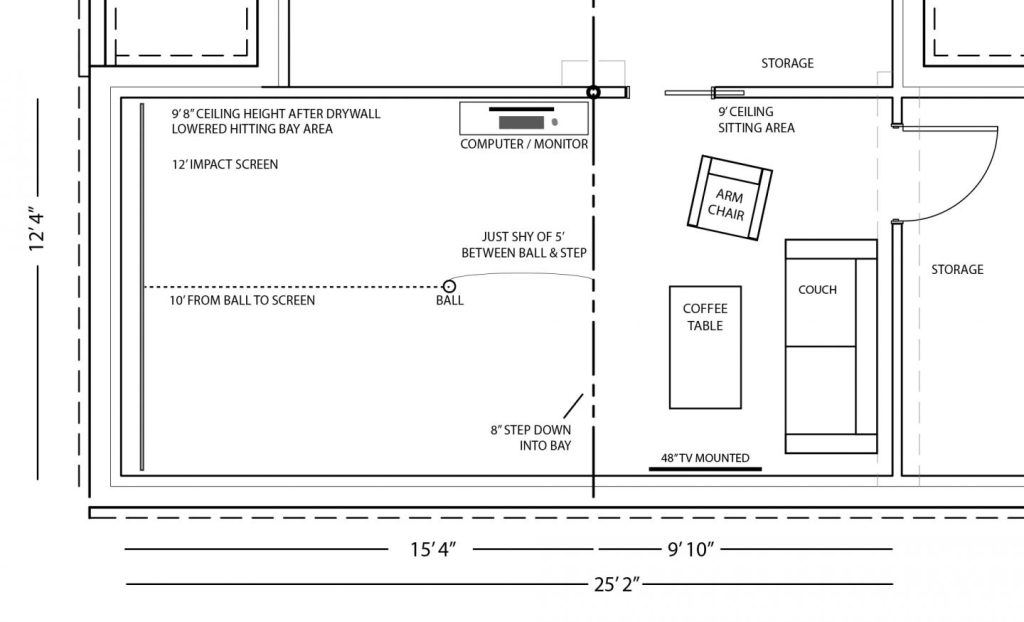
When you sketch out your floor plan, account for more than just the hitting zone:
- Projector placement: A short-throw projector (throw ratio of 0.4:1 to 1.0:1) mounts on the ceiling above or slightly behind the hitting area, typically 4–8 feet from the screen. This eliminates the shadow your body casts during the swing. Ultra-short throw projectors can sit as close as 0–4 feet from the screen.
- Tee offset for narrow rooms: If your room is close to the 10-foot minimum width, shift the hitting mat toward the wall on your trailing side (right wall for right-handed players). This gives your lead-side swing arc more clearance.
- Spectator and lounge space: Leave at least 6–7 feet of open floor behind and beside the hitting zone for guests, seating, or equipment storage.
- Garage door rails and opener: This is specific to garage installs, but can be a bit tricky depending on how you are laying out your simulator. You need to ensure your enclosure, projector mount, and swing won’t interfere with those elements.
Design Principles That Work
Lighting matters more than you think. Track lighting with dimmable LEDs lets you keep ambient light off the impact screen while still illuminating the rest of the room. Avoid overhead fixtures that wash out the projected image.
Sound treatment keeps the peace. A golf ball hitting an impact screen at 150+ mph is loud. Acoustic foam panels on the walls and ceiling around the hitting area absorb a surprising amount of that noise. Heavy curtains and thick rugs help too, especially in attached garages or basement rooms that share walls with living spaces.
Keep it clean and functional. The best simulator rooms have a dedicated spot for clubs, balls, and accessories — a simple wall-mounted rack or a cabinet keeps things organized. Clutter kills the vibe.
Golf Simulator Lounge Area Design
The lounge area is where a simulator room goes from “practice space” to “favorite room in the house.” A few ideas that work well:
- Seating: A leather couch or a few bar stools positioned behind the hitting zone. Keep them far enough back to be safe — at least 7 feet from the tee.
- Bar area: A small bar cart or countertop with a mini fridge is one of the most popular additions. Position it against the side wall, away from the swing path.
- TV or secondary screen: Mount a TV on the side wall to display leaderboards, shot data, or a game on during group sessions.
- Lighting accents: LED strip lights behind shelving or along the ceiling perimeter add atmosphere without competing with the projector.
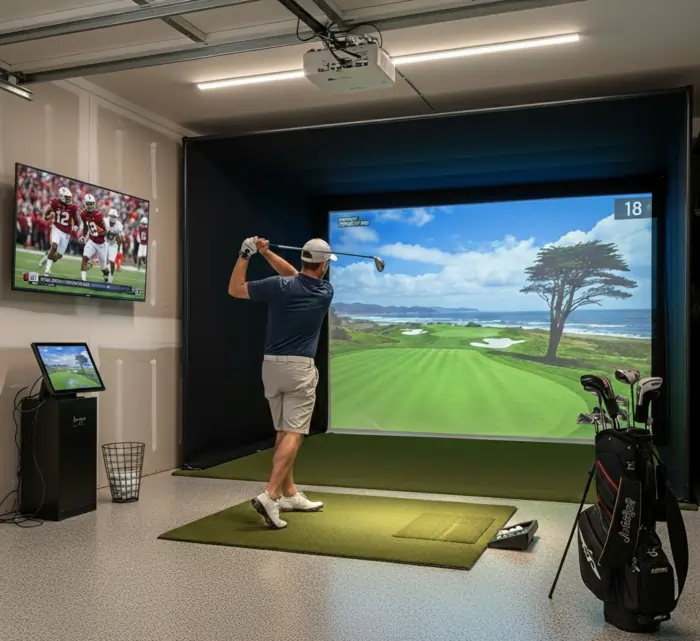
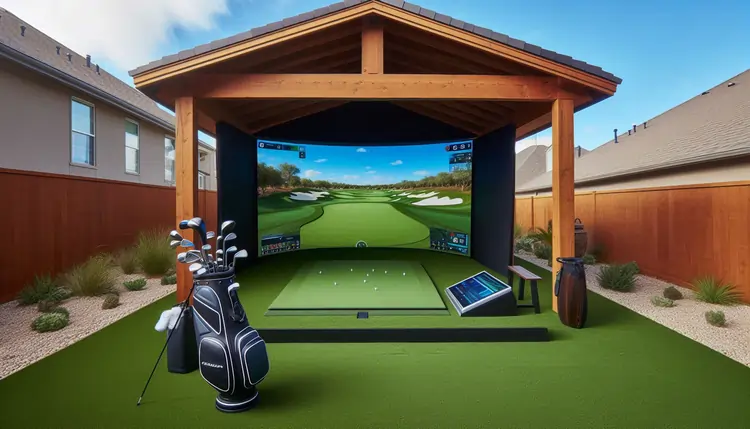
Garage Golf Simulator Ideas
The garage is the most popular location for a home golf simulator, and for good reason: garages tend to have the width and depth you need. The catch is usually ceiling height and climate control. See our in depth garage golf simulator suggestions here.
Typical garage ceilings range from 8 to 10 feet. If yours is 9 feet or higher, you’re in good shape for most setups. If it’s closer to 8 feet, you’ll want to test your swing carefully before investing.
Climate control is non-negotiable for year-round use. A ductless mini-split system is the go-to solution. DIY-friendly models like the MrCool DIY and Costway units (12,000 BTU) cost $500–$1,200 and are sufficient for a standard 2-car garage of 400–500 square feet. Insulate the garage door, walls, and ceiling first — without insulation, your mini-split will fight a losing battle and your energy bills will spike.
Dual-purpose setups are common. If you still need to park a car, consider a retractable impact screen or a setup that can be partially disassembled. Some owners mount the screen on a sliding track that pushes against the wall when not in use.
Garage door track interference is a frequent headache. Measure the clearance between the open garage door track and the ceiling — that’s your true usable height, not the ceiling height alone. Some builders relocate the garage door opener to a side-mount position to reclaim a few inches.
Basement Golf Simulator Ideas
Basements offer consistent temperatures and sound isolation, making them ideal for simulator builds. The main challenge is ceiling height, which in many basements sits at 8 to 9 feet. See our in-depth suggestions on basement golf simulator ideas here.
At 8 feet, you’re limited. You can practice with irons and wedges, but full driver swings are out for most golfers. At 8.5 feet, some shorter players with flatter swings can make it work. At 9 feet, most golfers are comfortable with every club.
Watch for obstructions. Ductwork, support columns, plumbing, and low-hanging beams all eat into your usable space. Map your swing arc around these before choosing where to place the hitting mat. In many basements, the highest point is between beams — position your tee there.
Moisture matters. Basements are prone to humidity. A dehumidifier keeps moisture from damaging electronics and prevents the impact screen from developing mildew. For flooring, avoid materials that trap moisture underneath — foam tiles with drainage channels or turf over a raised platform both work well.
The theater-sim combo is a popular design for basements. Mount a retractable impact screen in front of your main wall and use the same projector for movies and golf. When the screen goes up, the room returns to home theater mode.
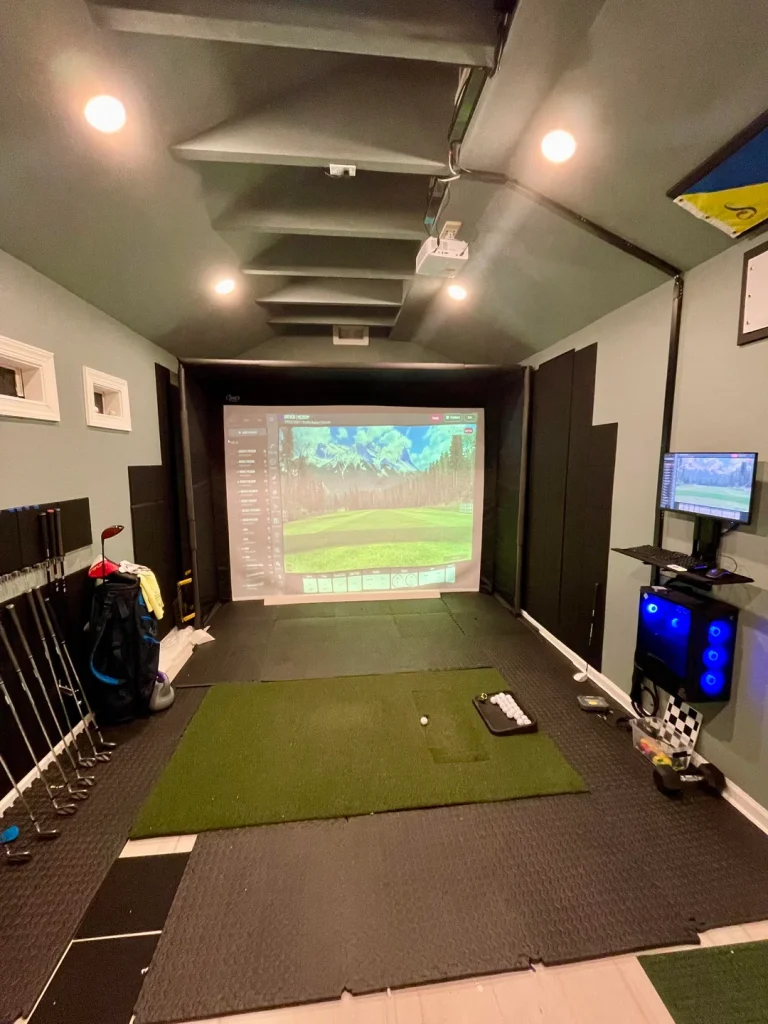
Golf Simulator Shed Plans & Ideas
A dedicated shed gives you total control over dimensions, insulation, and layout — plus it keeps your simulator separate from the house. This is the dream build for a lot of golfers – see our in-depth guide on golf simulator sheds.
Minimum shed size: 12 × 20 feet (240 sq ft). This gives you enough depth for the hitting zone and screen, but not much room for anything else.
Ideal shed size: 14 × 24 feet (336 sq ft) or larger. At this size, you have room for a small lounge area, equipment storage, and comfortable swing clearance on all sides. A 16 × 30 shed gives you even more flexibility for bar seating and multi-purpose use.
Ceiling height: Build to at least 10 feet. Since you’re constructing new, there’s no reason to shortchange yourself. Many shed builders aim for 10–12 feet.
Cost breakdown:
| Component | Estimated Cost |
|---|---|
| Pre-built shed (12×20 to 14×24, basic) | $4,000–$15,000 |
| Simulator-ready shed (insulated, wired, finished interior) | $12,000–$25,000+ |
| Custom stick-built shed (fully finished) | $20,000–$60,000+ |
| Golf simulator equipment (launch monitor, screen, projector, mat, software) | $3,000–$25,000+ |
Costs vary widely by region and level of finish. A pre-fabricated shed with basic insulation and electrical runs much less than a stick-built structure with drywall, HVAC, and plumbing.
Don’t forget:
- Permits: Check local building codes. Many jurisdictions require permits for structures over a certain size (often 120–200 sq ft) also make sure you understand the required setbacks.
- Foundation: A concrete slab or compacted gravel pad is standard. The slab adds cost but provides a level, moisture-resistant base.
- Electrical and Internet: You’ll need at least a 20-amp dedicated circuit for the projector, computer, and launch monitor. Plan for additional outlets for lighting, HVAC, and a mini fridge. You’ll need internet for online play.
- Insulation and HVAC: Spray foam or batt insulation in the walls and ceiling, plus a mini-split system for heating and cooling. Without both, the shed is unusable in extreme temperatures.
Outdoor & Backyard Golf Simulator Ideas
An outdoor simulator gives you fresh air and a backyard-party atmosphere, but it introduces challenges that indoor setups don’t have: weather, sunlight, and equipment protection. Here are our outdoor sim recommendations.
Covered structures work best. A pergola with a louvered or solid roof, a covered patio, or a purpose-built pavilion keeps rain off the equipment. Some builders use retractable awnings or heavy-duty tarps on a wood frame — effective but less durable.
Sunlight is the enemy of projection. Standard projectors can’t compete with direct sunlight. You’ll need significant shade coverage over the screen area, or plan to use the simulator primarily in the evening. Some outdoor builds skip the projector entirely and use a large TV or monitor behind a net, relying on the launch monitor for data only.
Protect your gear. Electronics don’t mix with moisture. Build a weatherproof storage box or cabinet near the hitting area for the launch monitor, tablet, and projector when not in use. Use UV-treated netting and weather-resistant screen materials.
Wind affects ball flight data. Radar-based launch monitors are more sensitive to outdoor conditions. Camera-based systems that read the ball at impact are less affected, making them a better choice for outdoor setups.
Golf Simulator Man Cave Ideas
The man cave build is where entertainment and golf converge. The goal is a space that’s fun to hang out in even when nobody’s hitting balls.
Design themes that work well:
- Sports bar: Wall-mounted TVs, a bar top with stools, neon signs, and a tap system or mini fridge.
- Modern lounge: Clean lines, neutral tones, recessed lighting, and a leather sectional.
- Country club: Dark wood paneling, framed course prints, brass fixtures, and a humidor.
- Industrial garage: Exposed brick or concrete, metal shelving, Edison-bulb lighting, and raw wood accents.
Acoustic treatment is important in shared spaces. If the man cave is in the basement or an attached room, sound-dampening panels on the walls and ceiling prevent golf ball impacts from echoing through the house.
Consider a putting green. A section of putting turf leading away from the hitting area adds a practice element that guests can use simultaneously. Some builders add chipping targets along the side walls.
Golf Simulator Flooring Ideas
Flooring affects comfort, safety, ball reaction, and the overall look of the room. There are several approaches depending on your budget and goals.
Full-Room Turf
Covering the entire floor in artificial turf gives the room a cohesive, course-like feel. This is the premium look. You’ll want to lay turf over a cushioned subfloor — interlocking foam tiles (about 1–1.25 inches thick) are the standard base. The foam provides cushioning for your joints, keeps the turf from sliding, and helps “catch” balls after they bounce off the screen.
Cut out a section of the turf where the hitting mat sits so the mat surface is flush with the surrounding floor. This requires building a small recessed platform or using foam layers of different thicknesses to match heights.
Hitting Mat Only
The simplest option: a quality hitting mat on the existing floor. Common sizes include 5×5 feet (works for both right and left-handed players) and 4×7 or 5×10 feet (rectangular, good for a more natural stance). This is the budget-friendly approach and makes sense if you’re in a shared space or a garage where you want to minimize permanent changes.
Raised Platform with Integrated Mat
A raised wooden platform (typically 2–3 inches high) covered in turf with the hitting mat inset flush creates a defined tee box area. This is a middle-ground option between a full-room turf install and a simple mat-on-floor setup. The platform also hides any wiring for sensors or lighting underneath.
Putting Green Addition
Adding a section of putting turf (10–12 feet of stimp speed turf works best for realistic roll) or putting green extends the practice options and fills out the room visually. Companies like EZTee and Pro Putt Systems supply nylon putting surfaces that replicate tour-speed greens.
DIY Golf Simulator Plans: Step-by-Step
Building a golf simulator doesn’t require a contractor. Most home builds are DIY projects completed over a weekend or two. Here’s the framework.
Step 1: Measure Your Space
Grab a tape measure and record ceiling height, room width, and room depth at the exact location you plan to build. Do the swing test: take slow practice swings with your driver while standing on something 2–3 inches tall (to simulate a hitting mat). If the club clears the ceiling with at least 6 inches of buffer, you’re good.
Step 2: Choose Your Launch Monitor
This is the biggest decision and the biggest cost driver. Budget monitors (SkyTrak, Garmin Approach R10) run $2,000–$2,500 and work well in smaller spaces. Mid-range options (Bushnell Launch Pro, Foresight GC3) cost $5,000–$8,000 and offer higher accuracy. Premium systems (Trackman iO, Uneekor EYE XO2) start at $10,000+ and deliver tour-level data.
Your room dimensions will influence this choice. Camera-based monitors need less depth. Radar-based monitors need more. Overhead monitors need ceiling height but save floor space.
Step 3: Pick Your Software
Golf simulator software is what displays the courses and game modes. Popular options include GSPro (affordable, community-driven), E6 Connect (polished graphics, licensed courses), and TGC 2019 (huge course library). Most software runs on a Windows PC — budget $800–$1,500 for a capable gaming computer if you don’t already have one.
Step 4: Select the Enclosure and Impact Screen
The enclosure frames the screen and contains stray shots. Standard impact screens range from 9 to 16 feet wide and 5 to 10 feet tall. For most home setups, a screen that’s 10–12 feet wide and 7–9 feet tall hits the sweet spot. Side netting catches shanks and protects walls.
Step 5: Select and Install the Projector
A short-throw projector (throw ratio of 0.4:1 to 1.0:1) is the standard for golf simulators. Mount it on the ceiling above or just behind the hitting position to eliminate shadow. Calculate throw distance using: Throw Distance = Throw Ratio × Screen Width. For example, a projector with a 0.7:1 throw ratio and a 12-foot-wide screen needs about 8.4 feet from the projector to the screen.
Step 6: Set Up the Hitting Area and Finishing Touches
Lay your flooring, position the hitting mat, and calibrate the launch monitor per the manufacturer’s instructions. Add lighting, acoustic panels, and any lounge furniture. Run a few test shots to verify the projector image fills the screen and the launch monitor is reading data accurately.
Have questions about your build? Join the discussion with 75k+ simulator owners in our community forum on Reddit, or contact us directly for personalized recommendations.
This website is a participant in the Amazon Services LLC Associates Program, an affiliate advertising program designed to provide a way for websites to earn advertising revenues by advertising and linking to Amazon.com. Some of the links on this page are affiliate links. This means that, at zero cost to you, I will earn an affiliate commission if you click through the link and finalize a purchase.