Let’s be honest: after you drop a few thousand dollars on a launch monitor like a Uneekor Eye XO or a Bushnell Launch Pro, the last thing you want to do is spend another $3,000 on a pre-fabricated box made of aluminum extrusions.
I’ve been down this road. You look at the “pro” enclosures online and think, it’s just a frame and some fabric. I can build that. You’re right. You can. But if you wing a DIY golf simulator enclosure without a plan, you’ll end up with a sagging screen, a frame that rattles every time you thinned a 6-iron, and a garage that looks like a construction site gone wrong.
Building your own enclosure is the ultimate “value play” in the simulator world. It allows you to maximize your specific space—whether that’s a tight 10×10 spare room or a massive garage bay—without paying the “convenience tax” of a kit.
Here are the DIY golf simulator enclosure plans and the exact technical blueprint you need to get it done right the first time.
Why 1-Inch EMT is the Gold Standard
If you’ve spent any time on r/golfsimulator, you’ve seen the debate: 1-inch vs. 1.25-inch EMT (Electrical Metallic Tubing).
Here is my take: 1-inch EMT is the sweet spot. It’s widely available at big-box hardware stores (Home Depot/Lowe’s), it’s incredibly affordable, and when paired with the right steel fittings, it is more than sturdy enough to handle high-velocity impact. 1.25-inch is overkill and makes finding the right corner connectors significantly harder.
The Pros of EMT:
- Cost: You can frame out a 10×12 enclosure for under $200 in conduit.
- Rigidity: Unlike PVC (which is a safety hazard for golf) or wood, EMT won’t snap or splinter.
- Customization: If your ceiling is 9’4″, you can cut your pipes to exactly 9’4″. You aren’t stuck with “standard” sizes.
The DIY Golf Simulator Enclosure Materials List
Before you head to the hardware store, you need a manifest. This golf simulator enclosure assumes a standard enclosure size (roughly 8-10 feet tall, 10-12 feet wide, and 5 feet deep), but the beauty of DIY is that you can adjust these lengths to fit your room.
1. The Pipe (1″ EMT Conduit)
You’ll typically need 10–12 lengths of 10-foot EMT.
- Verticals (A): The height of your enclosure.
- Depths (B): How far the “walls” come out toward the golfer.
- Widths (C): The crossbars for the top and bottom of the screen.
2. The Fittings (The Secret Sauce)
You cannot use standard electrical elbows. You need “Canopy Fittings” or “Steel Box Fittings” with thumb screws. These are designed to hold the pipe securely under tension.
- 3-Way Flat Corners (Diagram Item 2): These connect your top corners and bottom back corners.
- L-Fittings / 2-Way Corners (Diagram Item 1): Typically used for the front “feet” of the enclosure if you aren’t building a full floor frame.
3. The “Soft” Goods
- Impact Screen: Don’t skimp here. Whether it’s a Carl’s Place Premium or a high-end spacer mesh, this is the soul of your sim.
- Ball Bungees: You’ll need 40–60 of these to tension the screen to the frame.
- Pipe Insulation: Pick up some 1″ foam pipe lagging. If you shank a ball into the bare metal pipe, it’s coming back at your head at 100mph. Cover the metal.
Assembly Blueprint: Following the Diagram
Building the frame is essentially a game of adult LEGOs. Looking at the assembly diagram provided, let’s break down the logic.

Step 1: The Back Frame (The Screen Wall)
Start by laying out your “C” pipes (Width) and “A” pipes (Verticals).
- Use the 3-way connectors (Item 2) at the top corners.
- Connect the top “C” pipe to the two vertical “A” pipes.
- Expert Tip: Don’t tighten the set screws all the way until the entire structure is standing. You’ll need some wiggle room for leveling.
Step 2: The Depth Bars (The “B” Pipes)
Slide your “B” pipes into the remaining openings of the 3-way connectors. These define how deep your enclosure is. I generally recommend at least 5 feet of depth. This helps contain “pop-ups” and keeps the side curtains from interfering with your swing path.
Step 3: The Front Support
At the front of the enclosure (closest to the golfer), you have two options.
- Full Box: Use more 3-way connectors to create a full rectangle on the floor and ceiling. This is the most stable.
- The “L” Foot (Item 1): If you are tight on space or want a cleaner look, use the L-fittings at the bottom front to create “feet” that stabilize the vertical posts.
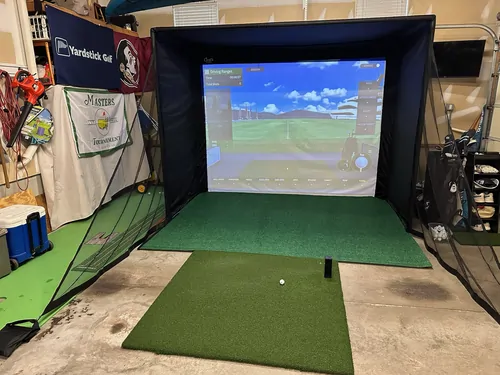
Finishing the Build: Screen, Skin, and Safety
Once your EMT frame is standing and level, you’ve essentially built the skeleton. Now you need to give it “muscles” (the screen) and “skin” (the fabric surround). This is where a DIY project starts looking like a $5,000 professional install—if you handle the tensioning and the gaps correctly.
Mounting the Impact Screen (The “Bounce-Back” Balance)
The biggest mistake I see guys make is mounting the screen perfectly flush to the frame. You need a 2-inch to 3-inch gap between the edge of your screen and the EMT pipe. This gives your ball bungees room to provide tension without bottoming out.
- The Method: Start at the top four corners. Use 6-inch or 9-inch ball bungees. Thread them through the screen grommets and wrap them around the pipe.
- The Pattern: Work from the corners inward. If you start on one side and go all the way across, you’ll end up with a skewed screen. Think of it like tightening the lug nuts on a tire—cross-pattern is best.
- Tensioning: You want the screen flat enough to eliminate wrinkles for the projector, but you should be able to push the center of the screen back about 4-6 inches with your hand. If it’s drum-tight, that ball is coming back at your shins like a rocket.
The Fabric Surround: “Blacking Out” the Cave
The fabric surround (the sides and roof) serves two purposes: it catches errant shots and it kills ambient light so your projector image actually pops.
For a true DIY build, heavy-duty blackout curtains or Commando Cloth are your best friends.
- Attachment: Use 2-inch Velcro wrap-around strips or heavy-duty zip ties to secure the fabric to the exterior of the EMT frame.
- The Roof: Drape the fabric over the top “B” and “C” pipes. I like to let it overhang the front by about 6 inches to create a “brow.” This helps shield the screen from overhead garage lights.
- The Sides: Ensure the side fabric is flush against the floor. If there’s a gap at the bottom, a shanked 4-iron will find it. I usually use a few sandbags or a weighted PVC pipe inside the bottom hem to keep the side curtains pinned down.
Eliminating the “Death Gap” with Foam Padding
Even with a perfect fabric surround, there is almost always a dangerous 2-4 inch gap between where the screen ends and the frame begins. This is where the ball bungees live—and where a stray shot can hit the metal pipe and ricochet back into your face.
To fix this, you need to “bridge the gap” with foam.
- The Material: High-density foam pipe insulation (the thick stuff) or, my personal favorite, triangular acoustic foam bolsters.
- The Install: Cut the foam to the length of your screen edges. You want to wedge the foam between the EMT pipe and the screen, covering the ball bungees entirely.
- The Finishing Touch: Wrap the foam in the same fabric as your surround, or use 4-inch wide adhesive Velcro strips to “flap” the surround fabric over the foam and onto the edge of the impact screen. This creates a seamless, professional-looking “bezel” that makes the screen look like it’s floating.
Honestly, this is the part that separates the “garage hacks” from the “studio builds.” Taking an extra hour to hide your bungees and pad those pipes isn’t just about aesthetics—it’s about not taking a Titleist to the forehead when you get a little too aggressive with a wedge.
Real-World Use Case: Small Space vs. Large Space
The “Tight Fit” Setup (e.g., 10’W x 8.5’H x 5’D): If you’re squeezed into a basement, every inch counts. In this scenario, I prefer mounting the frame as close to the back wall as possible (leave about 12-16 inches of space behind the screen to prevent “wall-slap”). Use [small-room launch monitors] like the Garmin Approach R10 or a SkyTrak+ to maximize the footprint.
The “Luxury Garage” Setup (e.g., 14’W x 10’H x 8’D): If you have the room, go wide. A 14-foot wide enclosure allows you to center the ball, which feels much more natural for both righties and lefties. This is where you bring in the big guns like Uneekor or Foresight overhead units.
Mistakes Most DIYers Make
1. Zero Protection for the Pipes
As I mentioned, bare metal is a liability. I see guys build beautiful DIY enclosures and then leave the top EMT rail exposed. One high wedge shot hits that pipe, and you’ve got a projectile problem. Use foam pipe insulation or wrap the pipes in heavy-duty black carpet padding.
2. Over-Tensioning the Screen
We all want a flat, crisp image for GSPro or E6 Connect. But if you pull that screen “drum-tight,” the ball will bounce back like a trampoline. You want the screen to have a little “give.” Use adjustable ball bungees and find the middle ground between “saggy” and “dangerous.”
3. Ignoring the Floor
The frame is only half the battle. You need a hitting mat and a “putting green” or turf to fill the gap between the mat and the screen. If the ball hits the concrete floor after hitting the screen, it’s going to bounce around your garage like a pinball.
The “Should You Actually DIY?” Checklist
I love a good project, but let’s be real—DIY isn’t for everyone.
Go DIY if:
- You have a non-standard room size.
- You enjoy the “build” process (and the satisfaction of saving $1,500).
- You already own a hack saw or pipe cutter.
Buy a Finished Kit if:
- You want it done in 45 minutes.
- You want a “blacked out” look with professional fabric sleeves included.
- The thought of measuring and cutting conduit gives you a headache.
If you’ve decided the DIY route is too much of a headache, check out our guide to the Best Golf Simulator Enclosure Kits for a “plug and play” solution.
Final Thoughts
Building a frame using these DIY golf simulator enclosure plans is honestly one of the most rewarding parts of the hobby. Once that 1″ EMT is locked into those canopy fittings, you’ll realize just how over-engineered (and overpriced) some of the retail options are.
Grab your conduit, follow the diagram, and spend the money you saved on a better hitting mat or a GSPro subscription. Your golf game (and your wallet) will thank you.
This website is a participant in the Amazon Services LLC Associates Program, an affiliate advertising program designed to provide a way for websites to earn advertising revenues by advertising and linking to Amazon.com. Some of the links on this page are affiliate links. This means that, at zero cost to you, I will earn an affiliate commission if you click through the link and finalize a purchase.